Image Map
Showing posts with label projects. Show all posts

Monday, September 24, 2012

Feeling Stripey


To truly appreciate that picture, you need to remember where it started...

Friday, September 21, 2012

Halloween Glitter Pumpkin Topiary


 Is that not the cutest "boo" you've ever seen?

I mean seriously...

Monday, September 17, 2012

Vintage Dresser Makeover

Meet Chloe...


Isn't she magnificent?  

I love her curvy shape...and her little short stubby, curvy legs...and the wheels...swoon!

Wednesday, September 12, 2012

The Game/Play/Family Room Update...

It seems like eons ago when we started this project...really it wasn't even 2 months ago but DANG-IT we just can't seem to get 'er done!  

You know the project you start by saying "hey, lets just paint this room this color" and all the sudden your re-doing the entire upstairs?  

Thursday, July 19, 2012

The Game/Play/Family Room Project...

Well...hello there folks!  Betcha wonder where the heck I've been lately.

Busy!  That's where!

I've got so many different projects started that I don't even know which end is up anymore.  It's all good though!
I'm making progress...slowly.

This particular project started about a month ago.  Sherwin Williams was having a 30% off sale on paints.  I'd be a fool NOT to take advantage of that right?  RIGHT!  And that's the story were telling Mr. AKM em' kay pumpkins?  Well, that was until they decided to have 40% off sale this weekend.  We are NOT telling Mr. AKM that little tidbit of info.  Capiche?
  
Anyway...I'd been dying to tackle painting the upstairs Game/Play/Family Room since we moved in (uhm, that was 4 years ago people) and decided that a 30% off sale was reason enough to jump on it!

The room wasn't all that bad to begin with...


Ok, who am I kidding.  It was awful.  Every time I walked into it I thought of baby poop.  YUCK!


And there was no design to it at all.  Years ago we had it filled with furniture that was eventually moved down to our main family room so this just became the place to "dump" all the overflow.  (that's a ping pong table folded up against the wall by the way).  In case you were wondering.

One rainy day I resolved to begin...and since it was raining and no one could go outside, I enlisted the help of the entire family.

And it went a little something like this...


That's a lot of "brown" to have to clean, caulk and tape up people!  But we did it!  WOOT!


This is the hallway just behind the Game Room.  It's pretty dark and dreary.

But now...


Soooo much better wouldn't you say?  

This room is still a work in progress (as you can see).  But I wanted to give you a sneak peek at what we're working on.

Keep checking back for more updates.

I will be posting a tutorial on how to paint the PERFECT stripes...can you guess which wall got striped?

Tell me what you think so far.  I'd love to hear your thoughts and ideas!


Tuesday, May 8, 2012

Persistance is key...

It's as Simple as Black & White
or is it white and black...


I started this project what seems like forever ago.  (You can read all about that here).  In all actuality it was about 2 months ago.  When I first brought this piece home, I was overjoyed to be working on a furniture project.  I had great ambition to have it all finished and ready to return to its owner within 2 weeks.

Then life happened…as it always seems to.

One weekend I found the time to sand the cabinet to rough it up a bit.  Then it sat for several weeks until I found the time to prime it.

And that was a nightmare.

The primer wouldn’t stick…it would just peel right off.  UGH!  To say that this was frustrating is so much of an understatement.  SO MUCH!  But I pushed through and sanded and primed again…and again.

And then I let it sit for a week to be absolutely certain that the primer was going to stick.

I checked a few areas here and there to make sure that it was good and primed and no peeling was going to occur.  All seemed good…you know where I am going with this don’t you?

Well, I busted out the sprayer and sprayed the cabinet with two light coats of Martha Stewart Latex paint in Silhouette.  Then used a very fine grit paper to smooth it out.  Everything was going good so I sprayed a final coat of black to the cabinet…then a realized that I forgot to paint the doors.

So I sprayed a few light coats on the doors and let them sit for a few days.

I really liked the way this project was going…it all seemed to be clicking into place.  The cabinet looked awesome!  Its owner was impressed…it’s all good.

And then the nightmare began…again.

I went to sand the doors before putting the final coat of paint on and it all began peeling off.  I don’t just mean a few areas…I mean in big looonnnnggg strips of paint.  In my haste to get the doors painted (after forgetting them) I FORGOT to check to make sure that the primer had stuck.  GASP!  It hadn’t.  Insert long stream of bad words here…no, seriously, longer than that.  I said a lot of not so nice things.  I seriously think my neighbors are afraid of me now.  I may have even thrown a few things around and slammed doors.  I call it painters rage.  I’m just saying.

I suddenly hated this project that I had so much adoration for in the beginning.

I loathed looking at this piece…and yet I left it sitting in my view for ANOTHER two weeks.  I seriously believe that I was secretly punishing myself for taking this project on to begin with…I mean as if I don’t have enough to do with my time.

Once I was certain that the paint was there to stay, I lightly distressed all the edges using a sanding block.  I wiped it all down with a tack cloth then wiped on a coat of Minwax Stain in my all time favorite color…Special Walnut.  I did not remove the excess stain.  Instead, I let it sit for several days to soak in.

After that process was complete, using a cheese cloth, I rubbed on a thin coat of Annie Sloan Clear Wax…waited 24 hours then applied a second coat….waited 24 more hours and buffed it with a soft cloth to achieve a low sheen. 


In the end, it turned out magnificently!  In fact, so much better than I had envisioned.  And totally worth all the frustration when I returned it to my mom knowing how much she appreciated it and LOVED the new look!  Pottery Barn watch out!  There's a new paint brush in town!


Have you had any nightmare projects like this that have turned out WONDERFULLY in the end?  If so, I'd love to hear about them and how you over came your obstacles.


You may find this post partying in the following places:


Friday:  Dwell on Joy- Finding Fabulous - Chic on a Shoestring Decorating - Fingerprints on the Fridge - Shabby Nest - WhipperberryMiss Mustard Seed - French Country Cottage - Sweet Tooth Friday (Alli-n-son), I'm Lovin' it Fridays (TidyMom), Friday Favorites (Simply Sweet Home), Latest & Greatest Friday (Days of Chalk and Chocolate), Bacon Time, Fusion Friday (Jane Deere Blog


Monday, March 19, 2012

Built-in's In the Closet

The Hall Closet Project
Building usefull space...

We have had this closet in our house that was completely USELESS!  It was built to be a coat closet; however, hangers didn't really FIT in the closet.  In order to close the door after hanging something up we had to turn the hanger side ways and hold it all in there with one arm then carefully close the door with the other.  More often then not, the door would pop back open again.  UTTERLY USELESS!  Grrr....  However, it did provide shelter for our vacuum cleaner and some coats that we never put on. 


Can you see how the hangers are slightly angled?  UGH!  Who builds things like that?  I know that our home is "older" and that things were built differently 20 years ago but to my knowledge, hangers HAVEN'T grown since then.  Have they???

Well, I got tired of it one day and in a HUGE fit of frustration...I ripped the thing apart!  It was therapeutic to say the least. 


As boring as that looks...it was so much nicer seeing it that way.  I could actually close the doors for a change.  It was so nice.

But I couldn't just leave it that way...then it really would have no use to me.

So I busted out some paint I had leftover from my bedroom and went to town...


Love me some Frog Tape...don't you?  That stuff really works too!  As you can see, I just slapped the paint on there all willy nilly like.  I mean, its just a closet after all :)

And here she is all painted up in her new color.  I think she looks lovely in the Benjamin Moore shade of Windchimes ...


While we waited for the paint to dry, we headed out to Home Depot to buy the wood for the shelves we will be installing.  Armed with the measurements, we found some pine boards that were perfect and asked the kind folks at Home Depot to cut our boards to size. 

Have you ever done that?  It was a first for us and let me tell you, it made our project go SOOOO much faster to have that done BEFORE we got home!  It definitely cut out some of the "error" factor that's for sure.

Now its time to add some shelves.  I thought about just putting some white shelves up and calling it a day but when I was perusing the isles at Home Depot I spotted a can of Weathered Oak stain by Minwax just sitting on a shelf all alone...It called to me.  So I brought it home...and stained my shelves...and we were in love.


Swoon!  I just love the way it looks against the paint. It's PERFECT!


Then it was time to fill 'em up with all my goodies that I have been dying to put in one place!


YEA!  I just love how bright and cheerful it all is now.  And the best part...I STILL have room to add more STUFF if I want too!  YEA ME!

This project was a cinch!  Mr. AKM and I were able to pull off this little closet switch-a-roo in less than one weekend thanks to the help of the awesome folks at Home Depot!  (no, this is not a paid advertisement...they were just super nice and helpful)!

So tell me, do you have a closet that is a major pain?  Have you rebuilt it to turn it into something that you can be proud of?  I'd love to hear all about it!


Wednesday, March 7, 2012

Decorators A.D.D. - It's a real problem people!


Admitting the Problem
Thats the First Step...or so I hear.

I know that we are WELL past the New Year and all the talks of resolutions and all but I made a resolution to myself this year that I am having trouble keeping.  I resolved to not start any new projects until I finish the one that I am working on.  I really hate myself for making that resolution.  Do you know how difficult it is to NOT start a new project when you are waiting to finish the one that you are working on?  I mean seriously.  I have ADD when it comes to projects I have realized.  So much so that I even tried to work around my own resolution in an effort to keep said resolution.  Sooo…I started 3 projects at once.  That way I could work on all 3 of them simultaneously and it would not be like “starting something new”.  It makes sense right??  In theory at least…or so I thought. 

My mom has this cabinet that she wants painting.  There is nothing wrong with the cabinet the way that it is.  In fact, most people would be in love with it as is.  The problem is, she’s had it for years and the color no longer goes with the décor of her kitchen.  Since purchased she has moved from a white “farmy” feel to more of a rustic oak and black vibe.  And now she wants the cabinet to feel the same vibe so to speak.  So it is in the beginning stages of its transformation from white to black.


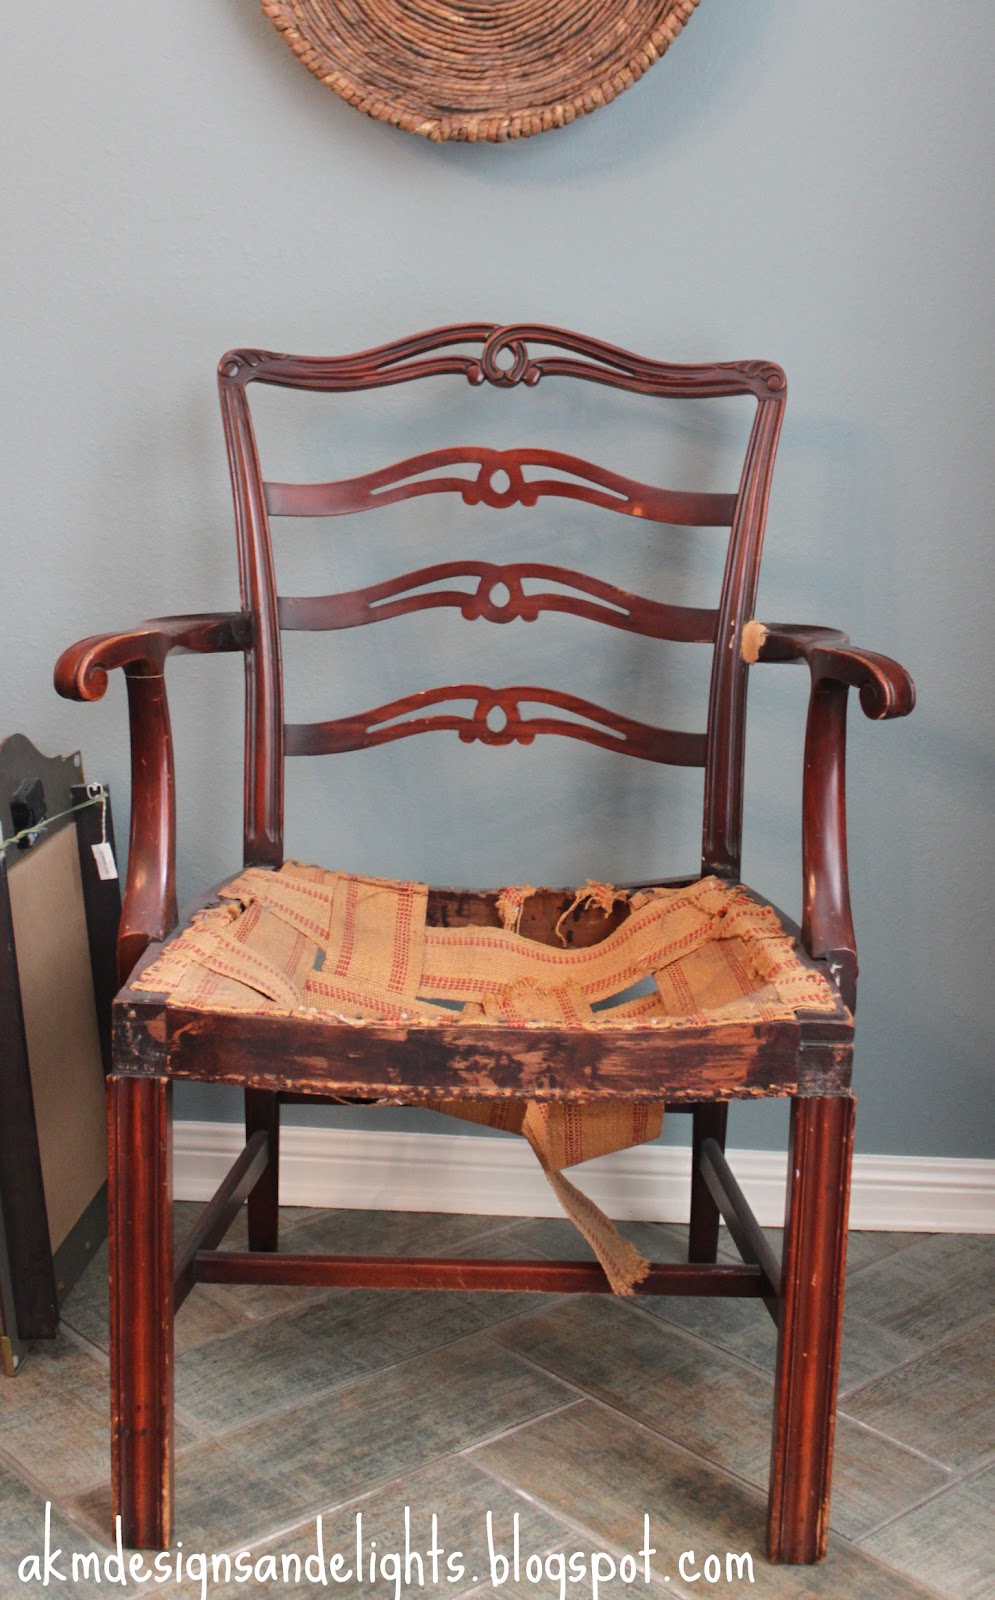
Then there is this chair that belonged to Mr. AKM’s grandmother.  It has sat like this in our home for about 2 years. 


It originally was covered in green shiny type fabric that was worn and stained badly but useable.  Then we moved from Turkey back to the United States and the chair suffered some broken arms.  It was sad.  Mr. AKM refused to let it become trash so he duct taped the joints of the arms to the back in an effort to save it.  That’s right, I said duct taped.  It actually sat in our living room like that for about 6 years before I decided it was time to start ripping it apart in an effort to repair it.  A few discreetly placed screws and some wood filler were used to mend the broken arms.  I wish I had pictures but that was long before my blogging days. 

Fast forward to now…I started by pulling all the upholstery wrapping off the seat.  Sanding the chair down and applying a single coat of ASCP in Old White…and then I hated it even more.  It was just TOO much white!  In comes the sander.  Using 120 grit first I started sanding off the white to let some of the wood show thru.  Slowly, I was falling in love again.  Then my 11 year old wanted in on some of the sanding action (I so wish I would’ve grabbed my camera for this!...BAD BLOGGER).  Now I typically use my sanding block for distressing but for some strange reason this time I decided to go with my electric palm sander.  Not a bad choice in my opinion as it was really working to my favor…until said 11 year old got involved.  Then ½ the paint disappeared off the back of the chair.  He had a hard time grasping the concept of “lightly” sanding.  We stood there looking at it dumb founded for a few minutes when Mr. AKM walked by.  He gasped and the 11 year old and I started to jump in with all kinds of we can fix its and don’t worries and Mr. AKM said “Why?  I totally LOVE IT”!  Insert collective sigh of relief here.  Whew! 

I then applied a coat of Annie’s Clear wax to the piece and lightly sanded with 220 grit then applied a 2nd coat of wax.  This chair is baby butt smooth let me tell ya!  LOVING IT! 

I had to search around a bit to find some new upholstery wrapping for the seat.  Finally found it at Hobby Lobby.  Who knew?  I’ve never re-done a chair before so I had NO clue where to find this stuff.  The wrapping was originally nailed to the frame but I decided to spare some time and just staple the stuff on using ½” staples.  Worked like a charm.


And this is how the chair sits.  I’m a bit intimidated to move on to the recovering aspect with fabric.  I’m es-sceeered to mess it up BIG TIME!


Please ignore the bad lighting.  I do most of my work at night and lets just say that the moonlight does not cast an etheral glow.  :)  I promise that when it is all finished I WILL take photos in the daylight so that the true colors show up.

So back to working on the cabinet….or NOT working on the cabinet I should say.  It’s been sanded and primed and sanded again and is eagerly awaiting its first coat of paint.  I got all the supplies together to get moving on this as I am SUPER excited to be working with my paint sprayer again (you can read about this magnificent little tool here).  When it is discovered that my air compressor has a leak in it.  GAH!  Seriously?  NOW it decides to get a leak after 5 wonderful years together?  Mr. AKM tore the whole thing apart to find said leak.  And he did…and he got after it with some JB Weld to show it who was boss.  Then the pipe that had the leak fell apart…and showed Mr. AKM who was the real boss (hint, NOT Mr. AKM). 

So here sits the cabinet until we get a new air compressor.  It’s a sad sight.  Sure I could go after it all old school with a brush and a roller but after you’ve tasted the glory of a sprayer…you just never really wanna go back. 

And while all this was going on, I decided it was time to tackle the files in my office.  I’ve always hated the cabinet that they are stored in.  It’s big and brown and ugly!  Mr. AKM got it many years ago when he was working from home to store all his business files in.  Sure I could repaint it but the truth is, we just don’t need all that file space. 

            
One day when I was walking through Tar-jay, I spotted these out of the corner of my eye on the clearance rack. 


They are the exact colors that I wanted for my office space.  SCORE!  At $4.97 each…I’m thinking I got a heck of a good deal!

Then found some awesome little file folders to match…


And was even able to print out these sweet little labels on my printer thanks to the online template they provided me with. 


And that’s as far as I’ve gotten because now I want to paint my office and add curtains and build shelves for the closet and.......the list goes on!  As if one needs to do all those things before making new files.  Jeesh!

Hey, I don't pretend to understand my own way of thinking...it's just who I am.

So there you have it...three projects started…not a single one finished…and a HUGE list growing of all the others that I want to be working on. 

Do you do this too?  Please tell me that I am NOT the only one suffering from Decorators ADD!


Thursday, February 9, 2012

Small Changes = Big Impact


Adding Ledges to the Staircase


For 3 long years I have looked at this space in my home and hated it.  Like, every time I walked thru the entry way or rounded the corner to head up the stairs I would literally groan to myself at my displeasure in this "space".  At one point I tried putting large frames filled with family photos there thinking that looking at all of our happy smiling faces would make me love this wall more. NOT!  In fact, it made me hate it even more for being so dark and dreary and not allowing me to see our smiling faces without grabbing a flashlight.  Ugh!

Eventually the frames came down and the wall went bare.  It was a sad, empty space at the bottom of our stairs.  No smiling faces...no pictures or art...just a wall of nothingness.

BORING!

Eventually I hung some mirrors in an effort to "brighten" the space a bit with some reflective light.


I felt like it was improving...but it was still lack-luster.  (see how dark it is...UGH)

Until my mom decided to re-decorate her living room that is...and then I got to have the cast-offs.  WOOHOOO!  Nothing like scoring some FREE decorations!  

She had these ledges that she bought from Pottery Barn several years ago that she was no longer using.  Ummm...SCORE!    At 3 feet each, these babies proved to the the perfect addition to my sad, empty space. 

So we Mr. AKM busted out some power tools and a level and went to work.


After finding only ONE stud to work with in a 3 foot space...WTH?  I thought that there were supposed to be studs every 16"?  HA!  Now that would be fun to have "studs" lined up every 16" wouldn't it?  Mine would go something like this...Ryan Reynolds, Ryan Gossling, Patrick Dempsey...Oh, yea, and Mr. AKM too!  Love ya babe!

Sorry...I got a little sidetracked on the stud finder...so we only had the one stud to work with;  therefore, we had to put some anchors in to support the other side of the bracket.  I'd show you photos of this, but I'm a bit embarrassed to show you the major holes mistakes that we made trying to accomplish this.  Suffice to say, these babies are NOT coming down anytime in the next millennium...in fact, if we move, these just might need to stay behind.  I'm just sayin'.

In the end...it was so worth the swiss cheese effect that our wall now sports...


And this is what I see when I walk down my stairs now...


Its the small things in life that make my heart go pitter patter.  And because Valentines Day is just around the corner, I traded out my photo mats and replaced them with red ones...I heart them :)

So what do you think of the space now? 
Do you have any projects that you completed for absoluty FREE from someone elses cast offs?  I'd love to hear/see them!

You may find this post partying in the following places:


I'm Lovin' it Fridays (TidyMom), Friday Favorites (Simply Sweet Home), Latest & Greatest Friday (Days of Chalk and Chocolate), Bacon Time, Fusion Friday (Jane Deere Blog). 

Saturday, January 7, 2012

First project of 2012 - The Front Door

Painting the Front Door
●●●●●●●●●●●●●●●●●●●●●●●●●●●●●●●●●●●●●●●●●●●●●●●●
(Benjamin Moore – Wythe Blue)


I have struggled with the decision on what project that I wanted to tackle first during the New Year 2012.  My list of projects grows by the second so this was not an easy decision to come by.  Do I go with what NEEDS to be done or what I WANT to have done.  Such a quandary.  Need and want really are the same thing...right?  I mean I WANT to be skinny healthy just as much as I NEED to be.  See...the same thing!  Mr. AKM begs to disagree though.  BOOO!!!  Sometimes I do not like him very much (but I still love him even when I hate disagree with him).

Several months ago our sweet little Australian Shepard, BlackJack, decided to do this to our front door when his cute little girlfriend (the yellow lab next door) walked by our front porch. 


NOT COOL!  He had never done this before, nor has he done it since.  While I was pretty mad at the time about it, I decided it was fate that it happened.  I had long since wanted to paint the door since we moved in but just never got around to doing it.  Its been on my LONG list of to-do's for 3 years.  Really I'm NOT a procrastinator.  I'm Not!  There were just other things that needed to be done 1st...like baking brownies or painting my toenails.  A girl has to have priorities ya know :) 
Sooo the dog ruined the door...then I got this sweet little coupon in the mail for a FREE pint of Benjamin Moore Paint at Ace Hardware.  Umm..SCORE!  So my want to paint the door turned into a "need"...see how that works out?  I'd been eyeing some pretty sweet doors on Pinterest that were all sporting the same color (Benjamin Moore - Wythe Blue).  Coincidence?  I think not!  So in about a week my front door will go from this...


To something more like this....
Cottage and Vine
Source

20111103-122745.jpg
Source
I just love that color don't you?  It's like the PERFECT blue/green/turquoise-y shade (yes, turquoise-y is a word).  LA-UVE it!  So off to Ace I went and got my FREE pint-o-paint.  Squeals!
This weekend I shall begin the process of painting the front door to include sanding, filling in the lovely gouges that my dog left behind, sanding some more, taping off the glass and FINALLY priming and painting it.  Whew! So much for a small little door doncha think?

Tune in next week to see the progress....

Friday, December 16, 2011

Lets get crafty...

This year for Christmas I we decided that all gifts given would be of the homemade persuasion.  We were only allowed to use items that we had on hand.  Period...no ifs, ands or buts!!  Mama was SERIOUS!  Do you know how creative one has to be when coming up with things to make for people out of ONLY things that we have in our possession WITHOUT spending any money?  Seriously people...this was crazy...like crazy-town kinda crazy!  There was some running around...some digging through old boxes...the attic got involved...some hairs got pulled out...a few bottles of wine disappeared...some things even crawled out from under beds to get all caught up in the excitement. 

In the end, I realized that I needed to enlist some help.  The first project on my list was for my youngest nieces.  They wear these cutesy little hair ribbons all the time.  You know the ones.  They look like all different colored corkscrews and are attached to little hair clips or barrettes.  SO CUTE!  I tried putting them in my own hair a time or two but I just got strange looks...stares even.  Apparently it is not "cute" when a thirty-something year old wears hair bows.  Who knew? 

Anyway...back to the project.  Since they have so many hair ribbons, I decided they needed some place equally as cute as they are to display them on.  I'm such and Awesome Aunt aren't I?  I had practically everything I needed...I only lacked a "few" items...fabric...batting...ribbon...I know what your thinking...what did I have, right?  Don't judge me!  I had the frame, wood, paint, staples and hot glue sticks, wait, scratch that, I had to snag some of those from my mom too.  Well, at least I HAD the idea!  Gosh people...don't be so judgemental :)   Besides, I wanted it to match their bedroom!  So after I appropriated the items that I needed...the project was off and running! 

(Disclaimer:  Please excuse the bad lighting in the following photos as the light dissappears from my world around 4:30 these days and most of my projects happen well after that time).


Isn't it cute!  It doesn't have to be used for hair ribbons....it can be used to put notes or pictures on.  Anything really!  I wish I had some hair ribbons to put on it to show case my AWESOME idea...but since I was laughed at for wearing mine, I have since gotten rid of them :)

So how did I do it you ask?  Well, let me just show you!  I had the frame.  I found some fire engine red spray paint from (I don't know what project).  I primed the frame in Krylon Primer Gray spray paint. Only one coat was needed...then I lightly sprayed on about 3 coats of the red...then I,


So totally EASY!  Anyone can do this!  From start to finish this project took all of about an hour!  I say that is pretty dad-gum awesome myself! 

What do you think?  Think my nieces will love it as much as I do?

LinkWithin

Related Posts Plugin for WordPress, Blogger...