Image Map
Showing posts with label furniture. Show all posts

Monday, September 17, 2012

Vintage Dresser Makeover

Meet Chloe...


Isn't she magnificent?  

I love her curvy shape...and her little short stubby, curvy legs...and the wheels...swoon!

Wednesday, June 20, 2012

Finding the "New" in the "Old"...


I love a good furniture re-do don’t you?  Taking something that looks like it belongs on the curb for the garbage man to dispose of and turning it into a cherished piece for our home.


That’s kinda how this little Craigslist find was for me.  I didn’t really want to buy anything that day.  Honestly!  

Actually, I was researching and trying to get an idea of how much to price some things that I was trying to get rid of when I spotted her. (that's my story and I'm sticking to it)

There she was…all brown and banged up with her little tear-drop handles all covered in rust.  She was just crying for some love!  I wish I had a photo to share of her before her makeover but somewhere between start to finish…the before photos were lost.  UGH!

Suffice to say, she looked a bit like this… 

  
But oh did she have potential!  In all honesty, I have a thing for old vintage things in their original state.  I could’ve just lived with her as is if not for the horrific smell!

I’m thinking she was used as a kitty litter box…or close to one???  It was bad people!

So I busted out the sander and went to town.  There wasn't much left of the original finish so sanding went pretty quickly.

First I used a 120 grit sandpaper all over to take off all the paint splatter covering her and give her a smooth finish.  My initial thought was to restore her back to her original beauty but the more I sanded, the more I realized that was not going to be possible.

The wood had some cracks in it that needed to be filled and some warping issues that needed, well some caulk!  So I had to come up with a new plan of action.

In came a sample pot of Behr paint that I’d gotten in Antique Tin.  I loved the color and just had to get a sample of it…but had no clue where I was going to use it. 


Considering it’s a small piece, I figured this would be the perfect place to try it out!

I removed the drawers, tapped off the top, slapped on a face mask and filled up my paint sprayer with paint and off to paint’in I went!


After the first coat of paint dried, I sanded it lightly with 220 grit paper and then applied a second coat…sanded again with 220 grit then applied a light third coat for good measure.

In between coats of paint on the chest, I started staining the drawers.  I used my all time favorite stain, Minwax in Special Walnut.  LOVE IT!  Can never go wrong with it.


Once the chest was done drying, I applied three coats of the same stain to the top, let that dry for 24 hours and then applied a coat of Annie Sloan Clear Wax to the entire piece…let it sit for 24 hours, applied a second coat of Wax…waited 24 hours and then buffed her to a shine!    


I just love the way she turned out...don't you?


She's the perfect blend of rustic and chic!


You may find this post partying in the following places:


Tuesday, May 8, 2012

Persistance is key...

It's as Simple as Black & White
or is it white and black...


I started this project what seems like forever ago.  (You can read all about that here).  In all actuality it was about 2 months ago.  When I first brought this piece home, I was overjoyed to be working on a furniture project.  I had great ambition to have it all finished and ready to return to its owner within 2 weeks.

Then life happened…as it always seems to.

One weekend I found the time to sand the cabinet to rough it up a bit.  Then it sat for several weeks until I found the time to prime it.

And that was a nightmare.

The primer wouldn’t stick…it would just peel right off.  UGH!  To say that this was frustrating is so much of an understatement.  SO MUCH!  But I pushed through and sanded and primed again…and again.

And then I let it sit for a week to be absolutely certain that the primer was going to stick.

I checked a few areas here and there to make sure that it was good and primed and no peeling was going to occur.  All seemed good…you know where I am going with this don’t you?

Well, I busted out the sprayer and sprayed the cabinet with two light coats of Martha Stewart Latex paint in Silhouette.  Then used a very fine grit paper to smooth it out.  Everything was going good so I sprayed a final coat of black to the cabinet…then a realized that I forgot to paint the doors.

So I sprayed a few light coats on the doors and let them sit for a few days.

I really liked the way this project was going…it all seemed to be clicking into place.  The cabinet looked awesome!  Its owner was impressed…it’s all good.

And then the nightmare began…again.

I went to sand the doors before putting the final coat of paint on and it all began peeling off.  I don’t just mean a few areas…I mean in big looonnnnggg strips of paint.  In my haste to get the doors painted (after forgetting them) I FORGOT to check to make sure that the primer had stuck.  GASP!  It hadn’t.  Insert long stream of bad words here…no, seriously, longer than that.  I said a lot of not so nice things.  I seriously think my neighbors are afraid of me now.  I may have even thrown a few things around and slammed doors.  I call it painters rage.  I’m just saying.

I suddenly hated this project that I had so much adoration for in the beginning.

I loathed looking at this piece…and yet I left it sitting in my view for ANOTHER two weeks.  I seriously believe that I was secretly punishing myself for taking this project on to begin with…I mean as if I don’t have enough to do with my time.

Once I was certain that the paint was there to stay, I lightly distressed all the edges using a sanding block.  I wiped it all down with a tack cloth then wiped on a coat of Minwax Stain in my all time favorite color…Special Walnut.  I did not remove the excess stain.  Instead, I let it sit for several days to soak in.

After that process was complete, using a cheese cloth, I rubbed on a thin coat of Annie Sloan Clear Wax…waited 24 hours then applied a second coat….waited 24 more hours and buffed it with a soft cloth to achieve a low sheen. 


In the end, it turned out magnificently!  In fact, so much better than I had envisioned.  And totally worth all the frustration when I returned it to my mom knowing how much she appreciated it and LOVED the new look!  Pottery Barn watch out!  There's a new paint brush in town!


Have you had any nightmare projects like this that have turned out WONDERFULLY in the end?  If so, I'd love to hear about them and how you over came your obstacles.


You may find this post partying in the following places:


Friday:  Dwell on Joy- Finding Fabulous - Chic on a Shoestring Decorating - Fingerprints on the Fridge - Shabby Nest - WhipperberryMiss Mustard Seed - French Country Cottage - Sweet Tooth Friday (Alli-n-son), I'm Lovin' it Fridays (TidyMom), Friday Favorites (Simply Sweet Home), Latest & Greatest Friday (Days of Chalk and Chocolate), Bacon Time, Fusion Friday (Jane Deere Blog


Wednesday, March 7, 2012

Decorators A.D.D. - It's a real problem people!


Admitting the Problem
Thats the First Step...or so I hear.

I know that we are WELL past the New Year and all the talks of resolutions and all but I made a resolution to myself this year that I am having trouble keeping.  I resolved to not start any new projects until I finish the one that I am working on.  I really hate myself for making that resolution.  Do you know how difficult it is to NOT start a new project when you are waiting to finish the one that you are working on?  I mean seriously.  I have ADD when it comes to projects I have realized.  So much so that I even tried to work around my own resolution in an effort to keep said resolution.  Sooo…I started 3 projects at once.  That way I could work on all 3 of them simultaneously and it would not be like “starting something new”.  It makes sense right??  In theory at least…or so I thought. 

My mom has this cabinet that she wants painting.  There is nothing wrong with the cabinet the way that it is.  In fact, most people would be in love with it as is.  The problem is, she’s had it for years and the color no longer goes with the décor of her kitchen.  Since purchased she has moved from a white “farmy” feel to more of a rustic oak and black vibe.  And now she wants the cabinet to feel the same vibe so to speak.  So it is in the beginning stages of its transformation from white to black.


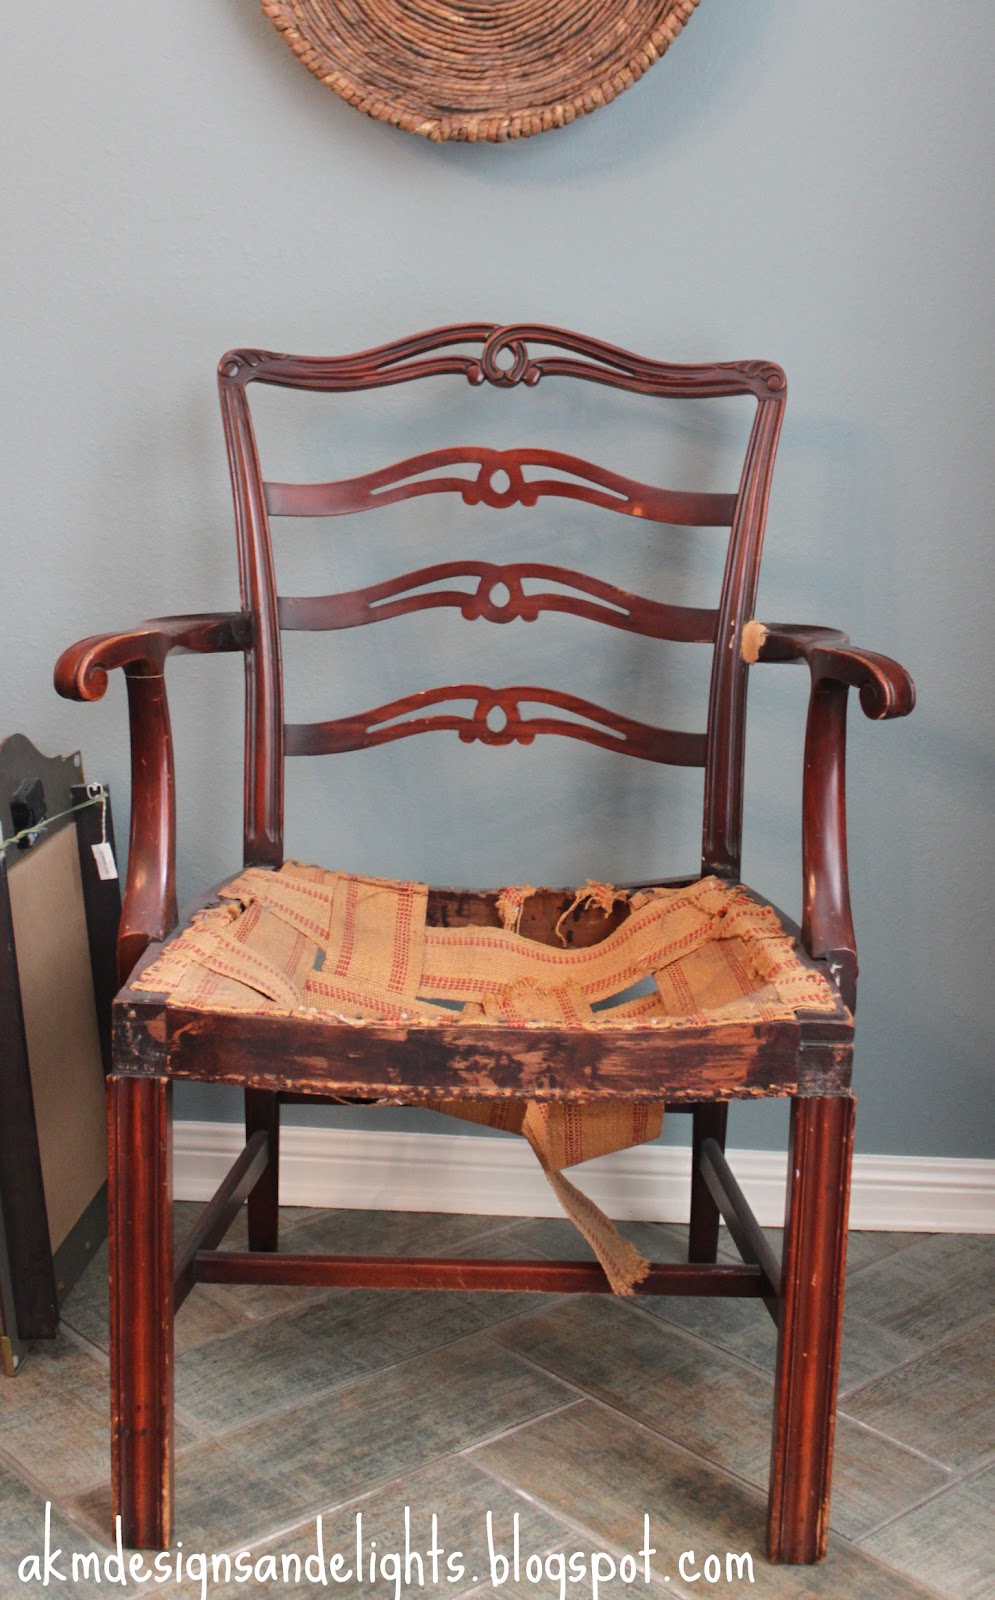
Then there is this chair that belonged to Mr. AKM’s grandmother.  It has sat like this in our home for about 2 years. 


It originally was covered in green shiny type fabric that was worn and stained badly but useable.  Then we moved from Turkey back to the United States and the chair suffered some broken arms.  It was sad.  Mr. AKM refused to let it become trash so he duct taped the joints of the arms to the back in an effort to save it.  That’s right, I said duct taped.  It actually sat in our living room like that for about 6 years before I decided it was time to start ripping it apart in an effort to repair it.  A few discreetly placed screws and some wood filler were used to mend the broken arms.  I wish I had pictures but that was long before my blogging days. 

Fast forward to now…I started by pulling all the upholstery wrapping off the seat.  Sanding the chair down and applying a single coat of ASCP in Old White…and then I hated it even more.  It was just TOO much white!  In comes the sander.  Using 120 grit first I started sanding off the white to let some of the wood show thru.  Slowly, I was falling in love again.  Then my 11 year old wanted in on some of the sanding action (I so wish I would’ve grabbed my camera for this!...BAD BLOGGER).  Now I typically use my sanding block for distressing but for some strange reason this time I decided to go with my electric palm sander.  Not a bad choice in my opinion as it was really working to my favor…until said 11 year old got involved.  Then ½ the paint disappeared off the back of the chair.  He had a hard time grasping the concept of “lightly” sanding.  We stood there looking at it dumb founded for a few minutes when Mr. AKM walked by.  He gasped and the 11 year old and I started to jump in with all kinds of we can fix its and don’t worries and Mr. AKM said “Why?  I totally LOVE IT”!  Insert collective sigh of relief here.  Whew! 

I then applied a coat of Annie’s Clear wax to the piece and lightly sanded with 220 grit then applied a 2nd coat of wax.  This chair is baby butt smooth let me tell ya!  LOVING IT! 

I had to search around a bit to find some new upholstery wrapping for the seat.  Finally found it at Hobby Lobby.  Who knew?  I’ve never re-done a chair before so I had NO clue where to find this stuff.  The wrapping was originally nailed to the frame but I decided to spare some time and just staple the stuff on using ½” staples.  Worked like a charm.


And this is how the chair sits.  I’m a bit intimidated to move on to the recovering aspect with fabric.  I’m es-sceeered to mess it up BIG TIME!


Please ignore the bad lighting.  I do most of my work at night and lets just say that the moonlight does not cast an etheral glow.  :)  I promise that when it is all finished I WILL take photos in the daylight so that the true colors show up.

So back to working on the cabinet….or NOT working on the cabinet I should say.  It’s been sanded and primed and sanded again and is eagerly awaiting its first coat of paint.  I got all the supplies together to get moving on this as I am SUPER excited to be working with my paint sprayer again (you can read about this magnificent little tool here).  When it is discovered that my air compressor has a leak in it.  GAH!  Seriously?  NOW it decides to get a leak after 5 wonderful years together?  Mr. AKM tore the whole thing apart to find said leak.  And he did…and he got after it with some JB Weld to show it who was boss.  Then the pipe that had the leak fell apart…and showed Mr. AKM who was the real boss (hint, NOT Mr. AKM). 

So here sits the cabinet until we get a new air compressor.  It’s a sad sight.  Sure I could go after it all old school with a brush and a roller but after you’ve tasted the glory of a sprayer…you just never really wanna go back. 

And while all this was going on, I decided it was time to tackle the files in my office.  I’ve always hated the cabinet that they are stored in.  It’s big and brown and ugly!  Mr. AKM got it many years ago when he was working from home to store all his business files in.  Sure I could repaint it but the truth is, we just don’t need all that file space. 

            
One day when I was walking through Tar-jay, I spotted these out of the corner of my eye on the clearance rack. 


They are the exact colors that I wanted for my office space.  SCORE!  At $4.97 each…I’m thinking I got a heck of a good deal!

Then found some awesome little file folders to match…


And was even able to print out these sweet little labels on my printer thanks to the online template they provided me with. 


And that’s as far as I’ve gotten because now I want to paint my office and add curtains and build shelves for the closet and.......the list goes on!  As if one needs to do all those things before making new files.  Jeesh!

Hey, I don't pretend to understand my own way of thinking...it's just who I am.

So there you have it...three projects started…not a single one finished…and a HUGE list growing of all the others that I want to be working on. 

Do you do this too?  Please tell me that I am NOT the only one suffering from Decorators ADD!


LinkWithin

Related Posts Plugin for WordPress, Blogger...