Image Map

Monday, March 26, 2012

Bake Me Happy...Chocolate Cupcakes withToasted Marshmellow Peanut Butter Buttercream Frosting


Lately all that I have been wanting in life is chocolate and peanut butter.
And I’m not just talking Reeses peanut butter cups.
That would be too easy.
I’m talking sandwiches…big, thick slathers of peanut butter and Nutella.  The kind that leaves the leftovers behind in the corners of your mouth for you to snack on later.
I’m talking about my ice cream…taking vanilla ice cream and mixing in swirls of Peter Pan Honey Roasted  peanut butter and chunks of chocolate pieces….sometimes I even throw some pretzels into the mix for a little salty goodness.
The other day I ate half a bag of pretzels dipping them into some peanut butter and then Nutella.
It’s a strange addiction I have lately.  I’m not sure how it all started.  I just know that one day I was eating a Reeses and the next thing I know I’m trying to conjure up different ways to get my peanut butter and chocolate fix WITHOUT having to go to the store to buy another bag of Reeses.
It’s not helping my waistline nor the size of my butt…I CAN say that for sure!
Today while I was working on finishing up my moms cabinet (you can read about that here) the craving struck again!
Actually, I’m starting to think this new craving has something to do with stress.  It seems that every time I crave it…something is not going right in my world.
Hmmm….
Any who, I remembered that I had frozen some of the cupcakes from when I made these.
And they were not frosted!
Oh the possibilities!
While I am not the first person to come up with this idea, it is the first time that I tried them for myself.
And I must say…OH. FREAKING. YUM!
So I give to you, my version of the Chocolate Peanut Butter Cupcake WITH Toasted Marshmellows.
Drum roll please...


And yes, it is okay to lick the screen ;)  I'll pretend I didn't see it!

Chocolate Cupcakes with Toasted Marshmellow Peanut Butter Buttercream Frosting
by Angi McCarthy


Ingredients (24 cupcakes)
Chocolate Cake
  • 2 cups sugar
  • 1-3/4 cups all-purpose flour
  • 3/4 cup plus 2 tablespoons unsweetened Hershey's Special Dark cocoa powder
  • 2 teaspoons baking soda
  • 1 teaspoon baking powder
  • 1 teaspoon kosher salt
  • 2 eggs
  • 1 cup buttermilk
  • 1 cup strong black coffee (I used Starbucks Cafe Verona Roast)
  • 1/4 cup vegetable oil
  • 1/4 cup EV Olive oil
  • 1 tablespoon vanilla extract
Toasted Marshmellow Peanut Butter Buttercream Frosting
  • 3 sticks salted butter softened (but not melted!)
  • 2 lbs confectioners (powdered) sugar
  • 1 cup peanut butter
  • 4 jumbo marshmellows toasted and pureed in food processor
  • 1 tablespoon vanilla extract
  • 4 tablespoons milk or heavy cream
Instructions
Chocolate Cupcakes
Heat oven to 350°F.
In the bowl of a stand mixer fitted with the whisk attachment or in a large bowl with an electric mixer, combine the sugar, flour, cocoa(s), baking soda, baking powder.
Mix on low until dry ingredients are thoroughly combined.
Add eggs, buttermilk, coffee, oils and vanilla. Beat on medium speed for about two minutes; the batter will be thin.
Pour batter evenly into prepared pans.
Bake cupcakes in preheated oven for 30 to 35 minutes or until wooden toothpick inserted in center comes out clean. Cool 10 minutes; remove from pans to wire racks. Cool completely before frosting.

Toasted Marshmellow Buttercream Frosting
Cream butter, peanut butter and toasted marshmellow puree for a few minutes in a mixer with the paddle attachment on medium speed. Turn off the mixer.
Sift 2 lbs powdered sugar into the mixing bowl.
Turn your mixer on the lowest speed (so the dry ingredients do not blow everywhere) until the sugar is absorbed by the butter.
Increase mixer speed to medium and add vanilla extract cream and beat for about 3 minutes.
If your frosting needs a more stiff consistency, add a little more powdered sugar. If your frosting needs to be thinned out, add additional cream 1 tablespoon at a time.
Pipe on your cupcakes and enjoy!
Powered by Recipage


You may find this post partying in the following places:


Monday, March 19, 2012

Built-in's In the Closet

The Hall Closet Project
Building usefull space...

We have had this closet in our house that was completely USELESS!  It was built to be a coat closet; however, hangers didn't really FIT in the closet.  In order to close the door after hanging something up we had to turn the hanger side ways and hold it all in there with one arm then carefully close the door with the other.  More often then not, the door would pop back open again.  UTTERLY USELESS!  Grrr....  However, it did provide shelter for our vacuum cleaner and some coats that we never put on. 


Can you see how the hangers are slightly angled?  UGH!  Who builds things like that?  I know that our home is "older" and that things were built differently 20 years ago but to my knowledge, hangers HAVEN'T grown since then.  Have they???

Well, I got tired of it one day and in a HUGE fit of frustration...I ripped the thing apart!  It was therapeutic to say the least. 


As boring as that looks...it was so much nicer seeing it that way.  I could actually close the doors for a change.  It was so nice.

But I couldn't just leave it that way...then it really would have no use to me.

So I busted out some paint I had leftover from my bedroom and went to town...


Love me some Frog Tape...don't you?  That stuff really works too!  As you can see, I just slapped the paint on there all willy nilly like.  I mean, its just a closet after all :)

And here she is all painted up in her new color.  I think she looks lovely in the Benjamin Moore shade of Windchimes ...


While we waited for the paint to dry, we headed out to Home Depot to buy the wood for the shelves we will be installing.  Armed with the measurements, we found some pine boards that were perfect and asked the kind folks at Home Depot to cut our boards to size. 

Have you ever done that?  It was a first for us and let me tell you, it made our project go SOOOO much faster to have that done BEFORE we got home!  It definitely cut out some of the "error" factor that's for sure.

Now its time to add some shelves.  I thought about just putting some white shelves up and calling it a day but when I was perusing the isles at Home Depot I spotted a can of Weathered Oak stain by Minwax just sitting on a shelf all alone...It called to me.  So I brought it home...and stained my shelves...and we were in love.


Swoon!  I just love the way it looks against the paint. It's PERFECT!


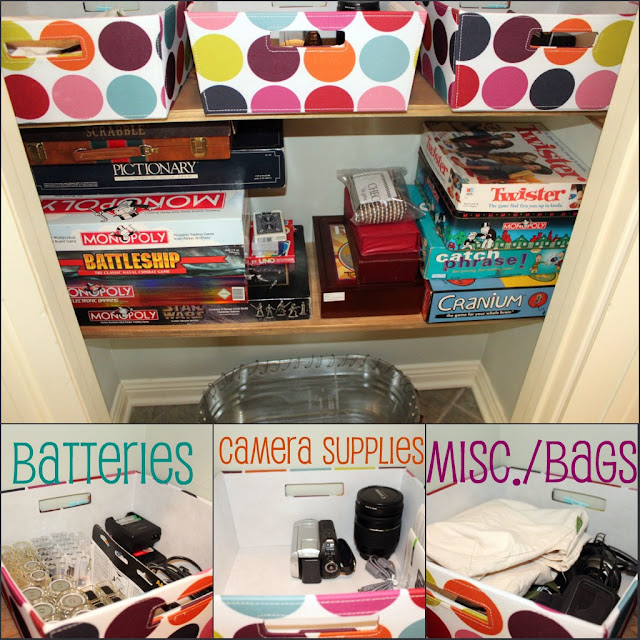
Then it was time to fill 'em up with all my goodies that I have been dying to put in one place!


YEA!  I just love how bright and cheerful it all is now.  And the best part...I STILL have room to add more STUFF if I want too!  YEA ME!

This project was a cinch!  Mr. AKM and I were able to pull off this little closet switch-a-roo in less than one weekend thanks to the help of the awesome folks at Home Depot!  (no, this is not a paid advertisement...they were just super nice and helpful)!

So tell me, do you have a closet that is a major pain?  Have you rebuilt it to turn it into something that you can be proud of?  I'd love to hear all about it!


Wednesday, March 7, 2012

Decorators A.D.D. - It's a real problem people!


Admitting the Problem
Thats the First Step...or so I hear.

I know that we are WELL past the New Year and all the talks of resolutions and all but I made a resolution to myself this year that I am having trouble keeping.  I resolved to not start any new projects until I finish the one that I am working on.  I really hate myself for making that resolution.  Do you know how difficult it is to NOT start a new project when you are waiting to finish the one that you are working on?  I mean seriously.  I have ADD when it comes to projects I have realized.  So much so that I even tried to work around my own resolution in an effort to keep said resolution.  Sooo…I started 3 projects at once.  That way I could work on all 3 of them simultaneously and it would not be like “starting something new”.  It makes sense right??  In theory at least…or so I thought. 

My mom has this cabinet that she wants painting.  There is nothing wrong with the cabinet the way that it is.  In fact, most people would be in love with it as is.  The problem is, she’s had it for years and the color no longer goes with the décor of her kitchen.  Since purchased she has moved from a white “farmy” feel to more of a rustic oak and black vibe.  And now she wants the cabinet to feel the same vibe so to speak.  So it is in the beginning stages of its transformation from white to black.


Then there is this chair that belonged to Mr. AKM’s grandmother.  It has sat like this in our home for about 2 years. 


It originally was covered in green shiny type fabric that was worn and stained badly but useable.  Then we moved from Turkey back to the United States and the chair suffered some broken arms.  It was sad.  Mr. AKM refused to let it become trash so he duct taped the joints of the arms to the back in an effort to save it.  That’s right, I said duct taped.  It actually sat in our living room like that for about 6 years before I decided it was time to start ripping it apart in an effort to repair it.  A few discreetly placed screws and some wood filler were used to mend the broken arms.  I wish I had pictures but that was long before my blogging days. 

Fast forward to now…I started by pulling all the upholstery wrapping off the seat.  Sanding the chair down and applying a single coat of ASCP in Old White…and then I hated it even more.  It was just TOO much white!  In comes the sander.  Using 120 grit first I started sanding off the white to let some of the wood show thru.  Slowly, I was falling in love again.  Then my 11 year old wanted in on some of the sanding action (I so wish I would’ve grabbed my camera for this!...BAD BLOGGER).  Now I typically use my sanding block for distressing but for some strange reason this time I decided to go with my electric palm sander.  Not a bad choice in my opinion as it was really working to my favor…until said 11 year old got involved.  Then ½ the paint disappeared off the back of the chair.  He had a hard time grasping the concept of “lightly” sanding.  We stood there looking at it dumb founded for a few minutes when Mr. AKM walked by.  He gasped and the 11 year old and I started to jump in with all kinds of we can fix its and don’t worries and Mr. AKM said “Why?  I totally LOVE IT”!  Insert collective sigh of relief here.  Whew! 

I then applied a coat of Annie’s Clear wax to the piece and lightly sanded with 220 grit then applied a 2nd coat of wax.  This chair is baby butt smooth let me tell ya!  LOVING IT! 

I had to search around a bit to find some new upholstery wrapping for the seat.  Finally found it at Hobby Lobby.  Who knew?  I’ve never re-done a chair before so I had NO clue where to find this stuff.  The wrapping was originally nailed to the frame but I decided to spare some time and just staple the stuff on using ½” staples.  Worked like a charm.


And this is how the chair sits.  I’m a bit intimidated to move on to the recovering aspect with fabric.  I’m es-sceeered to mess it up BIG TIME!


Please ignore the bad lighting.  I do most of my work at night and lets just say that the moonlight does not cast an etheral glow.  :)  I promise that when it is all finished I WILL take photos in the daylight so that the true colors show up.

So back to working on the cabinet….or NOT working on the cabinet I should say.  It’s been sanded and primed and sanded again and is eagerly awaiting its first coat of paint.  I got all the supplies together to get moving on this as I am SUPER excited to be working with my paint sprayer again (you can read about this magnificent little tool here).  When it is discovered that my air compressor has a leak in it.  GAH!  Seriously?  NOW it decides to get a leak after 5 wonderful years together?  Mr. AKM tore the whole thing apart to find said leak.  And he did…and he got after it with some JB Weld to show it who was boss.  Then the pipe that had the leak fell apart…and showed Mr. AKM who was the real boss (hint, NOT Mr. AKM). 

So here sits the cabinet until we get a new air compressor.  It’s a sad sight.  Sure I could go after it all old school with a brush and a roller but after you’ve tasted the glory of a sprayer…you just never really wanna go back. 

And while all this was going on, I decided it was time to tackle the files in my office.  I’ve always hated the cabinet that they are stored in.  It’s big and brown and ugly!  Mr. AKM got it many years ago when he was working from home to store all his business files in.  Sure I could repaint it but the truth is, we just don’t need all that file space. 

            
One day when I was walking through Tar-jay, I spotted these out of the corner of my eye on the clearance rack. 


They are the exact colors that I wanted for my office space.  SCORE!  At $4.97 each…I’m thinking I got a heck of a good deal!

Then found some awesome little file folders to match…


And was even able to print out these sweet little labels on my printer thanks to the online template they provided me with. 


And that’s as far as I’ve gotten because now I want to paint my office and add curtains and build shelves for the closet and.......the list goes on!  As if one needs to do all those things before making new files.  Jeesh!

Hey, I don't pretend to understand my own way of thinking...it's just who I am.

So there you have it...three projects started…not a single one finished…and a HUGE list growing of all the others that I want to be working on. 

Do you do this too?  Please tell me that I am NOT the only one suffering from Decorators ADD!


Monday, March 5, 2012

Lucky Charm Cupcakes


Wow! It sure feels good to be back here again!  We've had viruses GALORE sweeping through our home.  It stared with the stomach virus, then the flu, and moved on to allergies/colds.  UGH!  After taking a look at the mountain of kleenex that we all blew through...ha ha, get it...we blew through.  Ok, it was bad humor, I know.  But I couldn't resist.  Anyway, we should own stock in Kleenex!

And just when we thought all was clear, my father-in-law landed himself in the hospital.  NOT COOL!  Can I just say that taking a trip to the ICU ward is NOT the proper way to spend time with your loved ones?  I can talk lightly about it now because he came home today; but I gotta say, we were really freaking out slightly scared. 

It's been a tough couple of weeks thats for sure. 

Sooo...to say the we are glad to be out of February and moving on to March is a bit of an understatement.

My dad has been after me for several weeks to make him a white cake with vanilla frosting.  

Nothing fancy mind you. 

Just a simple white cake...even the boxed kind would do.

But could I do that?  Just whip up a white cake out of a box and slap some canned frosting on it? 

Um...can I get a HELL NO!?

Since I have married into an Irish family (uh, hello, McCarthy...how much more Irish can one get?)   Well, perhaps O'Brian is more Irish, but really, who's checking right!? 

I decided that we needed a bit of the Luck of the Irish in our household.

So I topped these deliciously moist white cupcakes (that are not from box THANK you very much) with a sprinkle of Lucky Charms!


With their pink hearts, yellow moons, orange stars, and
green clovers....

They are Magically Delicious!


Lucky Charm Cupcakes
by Angi McCarthy
Keywords: cupcake spring
Ingredients (24 cupcakes)
    Moist White Cupcakes
    • (recipe adapted from King Arthur Flour)
    • 2 3/4 cups King Arthur Unbleached Cake Flour Blend
    • 1 2/3 cups sugar; superfine sugar is best
    • 1 Tablespoon baking powder
    • 3/4 teaspoon salt
    • 3/4 cup (12 tablespoons) unsalted butter, softened
    • 4 large eggs whites plus 1 whole large egg
    • 1/2 cup buttermilk
    • 1/2 cup whole milk
    • 2 teaspoons vanilla extract
    • 1 teaspoon almond extract
    Vanilla Buttercream frosting
    • 3 sticks unsalted butter
    • 2 tsps. clear vanilla extract (if you want bright white frosting)
    • 1 1/2 lbs powdered sugar
    • 4-6 Tablespoons heavy cream or milk
    Instructions
    Moist White Cupcakes
    1. Preheat the oven to 350°F. Prepare two 8" x 2" or 9" x 2" round pans; a 9" x 13" pan; or 2 standard cupcake pans (20 to 24 cupcakes) by greasing and flouring; or lining with parchment, then greasing the parchment. Note: Make sure your 8" round pans are at least 2" deep; if they're not, use one of the other pan options.
    2. Mix all of the dry ingredients on slow speed to blend. Add the soft butter and mix until evenly crumbly, like fine damp sand. It may form a paste, depending on the temperature of the butter, how much it's mixed, and granulation of the sugar used.
    3. Add the egg whites one at a time, then the whole egg, beating well after each addition to begin building the structure of the cake. Scrape down the sides and bottom of the bowl after each addition.
    4. In a small bowl, whisk the milks with the vanilla and almond extracts. Add this mixture, 1/3 at a time, to the batter. Beat 1 to 2 minutes after each addition, until fluffy. Be sure to scrape down the sides and bottom of the bowl.
    5. Pour the batter into the prepared pans. Bake for 25 to 35 minutes for 8" or 9" rounds; 36 to 42 minutes for a 9" x 13" x 2" sheet cake; or 18 to 20 minutes for cupcakes. A toothpick or cake tester inserted into the center will come out clean when done. Remove from the oven, remove from the pan, if desired (not advisable for a 9" x 13" sheet cake), cool on a rack, and frost.
    Vanilla Buttercream Frosting
    1. In a large bowl, cream butter until fluffy.
    2. With the mixer on low, slowly add in the powdered sugar and continue beating until well blended.
    3. Add in vanilla and 3 Tablespoons of heavy cream or milk. Blend on low unitl moistened.
    4. Add an additional 1 to 3 Tablespoons of heavy cream or milk until you reach desired consistensy. Beat at high speed until frosting is smooth and fluffy.
    Powered by Recipage

    You may find this post partying in the following places:


    LinkWithin

    Related Posts Plugin for WordPress, Blogger...