Image Map

Monday, April 23, 2012

Recipe Exchange...Strawberry "Crumb Top" Pound Cake


Hey yawl!  I am SUPER excited to be sharing this recipe with you today!  Savannah with Hammock Tracks asked me to join in on a recipe exchange with her.  I was a little nervous at first as I have never been apart of one before...buuuuttttt....I decided that this was a great opportunity to try something new AND connect with a fellow blogger.  Total win - win situation in my opinion! 

The way this works if you (like me) have never been apart of a recipe exchange before is this...we both peruse each others recipe files until we find a dozen things something that we'd like to try making for ourselves.  After slobbering all over my keyboard drooling over several options that Savannah had to choose from, I settled on her Strawberry Pound Cake. 

I will not lie, the major driving force behind this is my oldest son's insatiable craving for strawberries.  This kid can put away a pound of strawberries for breakfast alone...then polish off another pound after soccer practice and STILL want more.  To say he loves strawberries is a bit of an understatement.

And while the rest of us like them...we prefer them in our oatmeal or drowned in powdered sugar and scattered on top of pound cake.  So when I saw Savannah's recipe to put them IN our pound cake...I was SOLD!

I have to admit, I tweaked her recipe just a wee bit but I truly believe it would have been just as delicious had I left it alone. 

The main change that I made was adding a cinnamon crumb topping...just look at all that crumbly goodness on there!


OH my word...This cake was TO. DIE. FOR!

I can not thank Savannah enough for introducing me to this AMAZING recipe! 

Do yourself a favor and go make a loaf of this cake...brew a cup of tea...and sit down in front of your computer and enjoy all that Savannah with Hammock Tracks has to offer!


You'll be glad you did!

Strawberry Pound Cake with Crumb Topping

by Savannah with Hammock Tracks


Ingredients (1 loaf)
    Strawberry Pound Cake
    • 2 large eggs
    • 1/2 cup vegetable oil
    • 1/2 tsp almond extract
    • 1/2 cup sugar
    • 1/4 cup brown sugar
    • 1 -1/2 cups all purpose flour
    • 1/2 tsp baking soda
    • 1/4 tsp salt
    • 1 -1/2 cups strawberries, hulled and thinly sliced
    Cinnamon Crumb Topping
    • 1/4 cup COLD butter
    • 1/4 cup sugar
    • 1/4 cup brown sugar
    • 1/4 tsp. cinnamon
    • 1/4 cup flour
    Instructions

    Strawberry Pound Cake
    Preheat oven to 350 degrees.
    Spray (1) loaf pan generously with baking spray.
    In mixing bowl, beat the eggs until light and fluffy, then beat in the oil until blended.
    Beat in the sugars until well blended.
    Add almond extract and mix until incorporated.
    In a separate bowl, stir together the flour, baking soda and salt.
    Beat all but 2 tablespoons of the dry mixture into the egg/oil mixture.
    Add the strawberries to the remaining dry mixture and toss to coat the berries well.
    Fold this mixture into the batter and pour into prepared pan.
    Sprinkle Crumb Topping on top and press into with palm of hand.
    Bake in oven for 60 min. or until toothpick inserted in middle comes out clean.

    Cinnamon Crumb Topping
    Cut in butter to sugars, cinnamon and flour to form crumbs.
    Sprinkle crumbs on loaf.
    Powered by Recipage

    Monday, April 9, 2012

    Bake Me Happy...Cinnamon Crumb Sticks

    We have this local pizza place here named Double Daves.  Let me just start by saying, their pizzas are delish, but their Pepperoni Rolls ROCK!  Totally. Love. Them!  But I have to be honest and tell you that what calls us back there time and again is not the pizza nor the rolls.  It is their cinnamon sticks.  

    There truly are no words to describe them. 

    They are out of this world.  AH-Mazing!

    We can eat a whole tray of these things before we even eat our dinner...then we want to take another tray home to snack on later.  We don't, of course, but we WANT to.  Ok, sometimes we do. 

    Jeesh...don't be so judgy! 

    Well, one day I was purusing the Internet and I found these totally awesome looking Cinnamon Crumby thingys that looked just like them!  So I had to make them and find out for myself.  (Forgive me for not linking back to the site I found them at as I have no idea where it was...I printed the recipe and stuck it in a folder and it doesn't say anywhere on it where it came from....grrrrrr). 

    This recipe sat on my counter for a week as I tried to find sometime to make them. 

    Then on Thursday, after my sons baseball practice, I came home to find these sitting on the counter.


    Mr. AKM had come home from school early and decided to surprise us all with a little treat!

    And not only did he make these awesome little snacks...which taste WAY better then Double Daves, he took pictures of the whole process. 


    Isn't he the awesome-st EVER?  I think so! 


    Just get a look at all that cinnamon and sugary goodness! 

    YUM-O!

    So if your looking for an easy, cinnamon-y, totally DELISH treat, you simply MUST make these!

    Heck, if Mr. AKM can pull these off, anyone can!

    Cinnamon Crumb Sticks

    by Angi McCarthy
    Keywords: dessert cinnamon


    Ingredients
      Cinnamon Crumb Topping
      • 1/4 cup COLD butter
      • 1/4 cup sugar
      • 1/4 cup brown sugar
      • 1/4 tsp. cinnamon
      • 1/4 cup flour
      • 1 can Pillsbury Cresent Rolls
      Glaze
      • 1/2 cup powdered sugar
      • 1 Tbsp. softened butter
      • 1 1/4 tsp. vanilla
      • 1 to 1 1/2 Tbsp. milk
      Instructions

      Cinnamon Crumb Topping
      Preheat oven to 400 degrees F.
      Cut in butter to sugars, cinnamon and flour to form crumbs.
      On an ungreased cookie sheet, separate crescent roll dough into (8) triangles.
      Sprinkle crumbs on top of each triangle.
      Bake at 400 deg. for 8 - 12 minutes.
      Glaze
      Blend all ingredients together, drizzle over Cinnamon Crumb Sticks after they are removed from oven.

      Eat and enjoy!
      Powered by Recipage

      You may find this post partying in the following places:


      Thursday, April 5, 2012

      The Reason...

      Absence Makes the Heart Grow Fonder...
      (or so I'm told)

      My life has been hectic beyond belief lately.  Mr. AKM works during the day and goes to school full-time at night; therefore, I am, for all intents and purposes a single parent.  UGH!  How do people do that everyday?  For all those single parents out there…you totally ROCK!  Seriously.  You are so underpaid and monumentally underappreciated!

      If I’m not at my full-time day job, I am running my kids all over the place for their sports practices and games.  Three days a week I INSIST on going to my yoga TRX classes.  They. Can. NOT. Be. Missed!  End of story.  If I miss my “me” time, it makes for one un-happy mama.  And if mama ain’t happy, ain’t NOBODY happy!  It’s true.  I admit it. I can be a bit of a pain in the ass difficult to live with if I don’t get my “me” time to sweat my ass off and relieve a little tension 3 days a week.  That’s all I ask for is 3 measly hours a week for myself. 

      Lately, it has been difficult to get even that small amount of time for myself.  But I make it happen.  Most of the time.

      But because I make that happen, something else in my life has/had to give.  I thought about offering my kids up as Tribute (Hunger Games anyone)??  But was promptly reminded by my husband that THAT would be unacceptable.  Really??  Ya think? 

      So I passed on cleaning my house for three weeks straight.  I made the conscious decision to NOT clean my house.  Do any of you realize how difficult that is/was for a total neat freak to do?  It was painful people!  Seriously painful!  Then I found some adorable little dust bunnies playing peek-a-boo with me in the corner and had enough!  So, this past weekend, I cleaned house for THREE HOURS STRAIGHT.  So not cool! 

      I’ve decided to go back to my weekly cleaning schedule.

      I tried skipping on meals at night and making quickie sandwiches instead.  That was all well and good till about at night when everyone was STARVING and mowing through containers of ice cream and other goodies to help fill the void of not eating a healthy meal. 

      We are all 5 lbs heavier now.  So….

      I’ve decided to start cooking meals on the weekend to have throughout the week to help combat this.

      I have no time to work on projects…no time to bake.  There are at least 12 loads of laundry that needs to be done.  I need to help my oldest with his science project…my youngest with a book report…make lunches, cook dinners, clean the house, take the dogs for a walk, feed the dogs, the fish, grocery shop, mow the lawn, water the lawn and shovel something that resembles food into my own mouth.

      I am constantly running against the clock to fit it all into one day.  And I realized that I was no longer finding joy in any of it. 

      I was annoyed this past weekend that my kids insisted that I go see the Hunger Games with them.  All I could think of was the 4 hours that would be “wasted” not working on things that I needed to get done.  I resented THEM for wanting time with me. 

      That realization sucked the breath right out of me.  There are people that would give up anything to have time with their kids.  Moms and dads fighting wars would surely give up all that they could to spend 4 hours with their child to watch a movie, parents that have lost their child, children that have lost their parents.  People that would give anything just to HAVE kids…and here I was resenting it.  I am not proud of that. 

      So to get on to the point of this post…I have realized that burning the candle at both ends makes me a failure on all fronts.  I can not have it all without something falling through the cracks…and it seems that I have been the one falling through the cracks…which pulled everything else down with me. 

      So, what I am saying is this…please pardon my absence occasionally while I figure out how to balance what I love with what I must do.  I promise to make the most of this time so that I have something substantial to offer to you when I do make a post.

      So until then...God bless…


      Monday, March 26, 2012

      Bake Me Happy...Chocolate Cupcakes withToasted Marshmellow Peanut Butter Buttercream Frosting


      Lately all that I have been wanting in life is chocolate and peanut butter.
      And I’m not just talking Reeses peanut butter cups.
      That would be too easy.
      I’m talking sandwiches…big, thick slathers of peanut butter and Nutella.  The kind that leaves the leftovers behind in the corners of your mouth for you to snack on later.
      I’m talking about my ice cream…taking vanilla ice cream and mixing in swirls of Peter Pan Honey Roasted  peanut butter and chunks of chocolate pieces….sometimes I even throw some pretzels into the mix for a little salty goodness.
      The other day I ate half a bag of pretzels dipping them into some peanut butter and then Nutella.
      It’s a strange addiction I have lately.  I’m not sure how it all started.  I just know that one day I was eating a Reeses and the next thing I know I’m trying to conjure up different ways to get my peanut butter and chocolate fix WITHOUT having to go to the store to buy another bag of Reeses.
      It’s not helping my waistline nor the size of my butt…I CAN say that for sure!
      Today while I was working on finishing up my moms cabinet (you can read about that here) the craving struck again!
      Actually, I’m starting to think this new craving has something to do with stress.  It seems that every time I crave it…something is not going right in my world.
      Hmmm….
      Any who, I remembered that I had frozen some of the cupcakes from when I made these.
      And they were not frosted!
      Oh the possibilities!
      While I am not the first person to come up with this idea, it is the first time that I tried them for myself.
      And I must say…OH. FREAKING. YUM!
      So I give to you, my version of the Chocolate Peanut Butter Cupcake WITH Toasted Marshmellows.
      Drum roll please...


      And yes, it is okay to lick the screen ;)  I'll pretend I didn't see it!

      Chocolate Cupcakes with Toasted Marshmellow Peanut Butter Buttercream Frosting
      by Angi McCarthy


      Ingredients (24 cupcakes)
      Chocolate Cake
      • 2 cups sugar
      • 1-3/4 cups all-purpose flour
      • 3/4 cup plus 2 tablespoons unsweetened Hershey's Special Dark cocoa powder
      • 2 teaspoons baking soda
      • 1 teaspoon baking powder
      • 1 teaspoon kosher salt
      • 2 eggs
      • 1 cup buttermilk
      • 1 cup strong black coffee (I used Starbucks Cafe Verona Roast)
      • 1/4 cup vegetable oil
      • 1/4 cup EV Olive oil
      • 1 tablespoon vanilla extract
      Toasted Marshmellow Peanut Butter Buttercream Frosting
      • 3 sticks salted butter softened (but not melted!)
      • 2 lbs confectioners (powdered) sugar
      • 1 cup peanut butter
      • 4 jumbo marshmellows toasted and pureed in food processor
      • 1 tablespoon vanilla extract
      • 4 tablespoons milk or heavy cream
      Instructions
      Chocolate Cupcakes
      Heat oven to 350°F.
      In the bowl of a stand mixer fitted with the whisk attachment or in a large bowl with an electric mixer, combine the sugar, flour, cocoa(s), baking soda, baking powder.
      Mix on low until dry ingredients are thoroughly combined.
      Add eggs, buttermilk, coffee, oils and vanilla. Beat on medium speed for about two minutes; the batter will be thin.
      Pour batter evenly into prepared pans.
      Bake cupcakes in preheated oven for 30 to 35 minutes or until wooden toothpick inserted in center comes out clean. Cool 10 minutes; remove from pans to wire racks. Cool completely before frosting.

      Toasted Marshmellow Buttercream Frosting
      Cream butter, peanut butter and toasted marshmellow puree for a few minutes in a mixer with the paddle attachment on medium speed. Turn off the mixer.
      Sift 2 lbs powdered sugar into the mixing bowl.
      Turn your mixer on the lowest speed (so the dry ingredients do not blow everywhere) until the sugar is absorbed by the butter.
      Increase mixer speed to medium and add vanilla extract cream and beat for about 3 minutes.
      If your frosting needs a more stiff consistency, add a little more powdered sugar. If your frosting needs to be thinned out, add additional cream 1 tablespoon at a time.
      Pipe on your cupcakes and enjoy!
      Powered by Recipage


      You may find this post partying in the following places:


      Monday, March 19, 2012

      Built-in's In the Closet

      The Hall Closet Project
      Building usefull space...

      We have had this closet in our house that was completely USELESS!  It was built to be a coat closet; however, hangers didn't really FIT in the closet.  In order to close the door after hanging something up we had to turn the hanger side ways and hold it all in there with one arm then carefully close the door with the other.  More often then not, the door would pop back open again.  UTTERLY USELESS!  Grrr....  However, it did provide shelter for our vacuum cleaner and some coats that we never put on. 


      Can you see how the hangers are slightly angled?  UGH!  Who builds things like that?  I know that our home is "older" and that things were built differently 20 years ago but to my knowledge, hangers HAVEN'T grown since then.  Have they???

      Well, I got tired of it one day and in a HUGE fit of frustration...I ripped the thing apart!  It was therapeutic to say the least. 


      As boring as that looks...it was so much nicer seeing it that way.  I could actually close the doors for a change.  It was so nice.

      But I couldn't just leave it that way...then it really would have no use to me.

      So I busted out some paint I had leftover from my bedroom and went to town...


      Love me some Frog Tape...don't you?  That stuff really works too!  As you can see, I just slapped the paint on there all willy nilly like.  I mean, its just a closet after all :)

      And here she is all painted up in her new color.  I think she looks lovely in the Benjamin Moore shade of Windchimes ...


      While we waited for the paint to dry, we headed out to Home Depot to buy the wood for the shelves we will be installing.  Armed with the measurements, we found some pine boards that were perfect and asked the kind folks at Home Depot to cut our boards to size. 

      Have you ever done that?  It was a first for us and let me tell you, it made our project go SOOOO much faster to have that done BEFORE we got home!  It definitely cut out some of the "error" factor that's for sure.

      Now its time to add some shelves.  I thought about just putting some white shelves up and calling it a day but when I was perusing the isles at Home Depot I spotted a can of Weathered Oak stain by Minwax just sitting on a shelf all alone...It called to me.  So I brought it home...and stained my shelves...and we were in love.


      Swoon!  I just love the way it looks against the paint. It's PERFECT!


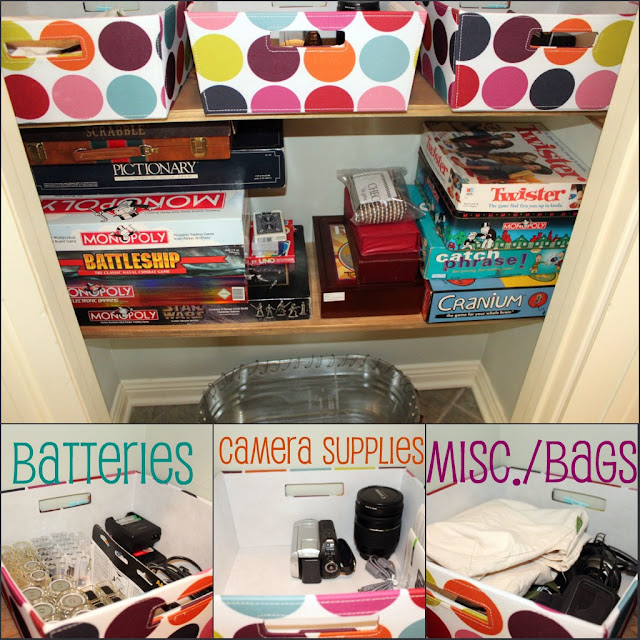
      Then it was time to fill 'em up with all my goodies that I have been dying to put in one place!


      YEA!  I just love how bright and cheerful it all is now.  And the best part...I STILL have room to add more STUFF if I want too!  YEA ME!

      This project was a cinch!  Mr. AKM and I were able to pull off this little closet switch-a-roo in less than one weekend thanks to the help of the awesome folks at Home Depot!  (no, this is not a paid advertisement...they were just super nice and helpful)!

      So tell me, do you have a closet that is a major pain?  Have you rebuilt it to turn it into something that you can be proud of?  I'd love to hear all about it!


      LinkWithin

      Related Posts Plugin for WordPress, Blogger...